
Designed to endure high foot traffic and exposure to temperature variations, a good set of indoor tiles can withstand a lot of wear over the course of their lifetime. However, while your tiles may be capable of lasting several decades, the same cannot always be said for the grout surrounding them. Although tough, both kitchen tile grouting and bathroom tile grouting can eventually crack, split, and fall out – or simply fade due to overexposure to cleaning products when tackling mould and mildew.
Regardless, at some point in the lifetime of your tiles, you’re likely going to need to think about regrouting them. Fortunately, tile regrouting is not particularly tricky; it just requires you to invest the right time and materials into it in order to complete the job properly.
So, if you’re thinking of regrouting tiles in your home and want to know the best way to complete this task, keep reading to learn more about how to regrout tiles properly in order to get that professional finish.
Kensington Natural Grey Antique-effect Porcelain
What exactly is tile regrouting
For the most part, tile regrouting is as it sounds – it’s the process by which you remove the old tile grout from around your tiles so that you can replace it with fresh grout in order to protect them and maintain your tile’s aesthetic finish.
Why exactly you might need to consider regrouting tiles in your home could be for any number of reasons. For example, it may just be that your tile grout is old and has cracked over time. Alternatively, moisture damage or poor installation could have shortened the lifespan of your grout, causing it to fall out in unsightly chunks.
Is it necessary to start regrouting tiles?
Regardless of the cause behind any flaking and cracking grout, the truth of the matter is that regrouting your tiles is pretty much essential if you want your tiling to last for an extended length of time.
The whole purpose of your grout is to protect your tiles and the tile adhesive from cracking and falling off by preventing moisture and debris from getting between them, as well as stopping your tiles from pressing against each other and breaking when they expand.
Therefore, if you leave your tiles unprotected, it’s highly likely to shorten their lifespan, requiring you to spend far more money than necessary to replace them compared to simply regrouting them to begin with.

Umbrian Grey Brushed Sandstone
How to regrout your tiles yourself
If you’ve looked at your tiles and decided that they are in need of regrouting, then the first thing to do is make sure you have the right tools and safety gear to hand in order to do the job properly.
We recommend acquiring the following gear and tools before you begin regrouting your tiles:
- Safety Goggles
- A face mask
- Protective gloves
- A rotary tool equipped with a circular saw blade
- A flathead screwdriver
- A Stanley knife
- A stiff brush
- A grout rake
- A vacuum cleaner
- A sponge
- A bucket of water
- A dry cloth
Once you have all of these, you’re ready to start regrouting your tiles:
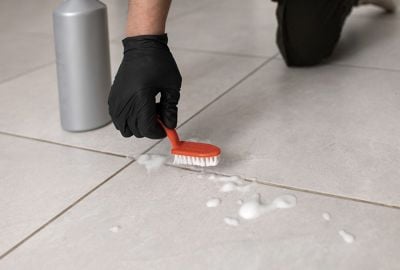
1. Removing your old grout
When it comes to the tile regrouting process, the first step is naturally going to be removing the old grout from between your wall tiles or floor tiles. This can be done in one of two ways: either manually or using a suitable power tool.
Using a suitable power tool is by far the fastest method to remove grout, however removing it manually with a grout rake is just as effective, if more labour-intensive. Take a look at our guide on how to remove grout for a full breakdown of how to remove grout using either method.
Then, once all your grout has been removed, you’ll want to go over the de-grouted area with a vacuum cleaner to suck up any loose dust and debris still present that could impact the adhesiveness of your new grout.
2. Wipe down the area
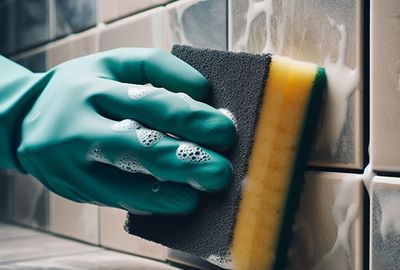
Next up, once you’ve removed all of your old grout, you’ll want to wipe down the entire area with a damp sponge to ensure that everything is clean and clear for your new grout to settle in.
Make sure you go over the area you want to regrout at least twice and then leave the space to dry completely before moving on to steps 3 and 4.
3. Reseal your tiles
While not an essential step for everyone regrouting their tiles, if you’re yet to seal the tiles around the area you’re regrouting, or you want to apply tile sealer to them as a precaution against future wear-and-tear or grout haze, then now is the time to do so.
This is particularly useful if you happen to be regrouting natural stone tiles or tiles in your bathroom, and we go into much greater detail on the sealing process in our guide to sealing natural stone tiles.
4. Apply your new grout
With your old grout removed, your tiles sealed, and the area dried, it’s now finally time to apply your new grout. So, take whatever type of grout you’re using, mix it up as instructed on the pack, and then apply it to your walls using a grout float until the whole area is covered.
Much like in our section on removing your old grout, we go into much more detail on this step in our dedicated tile grouting guide, which we’d highly advise reading before completing this step.
Then, once all the grout has been applied, you can take a damp sponge and use it to wipe away all the excess grout around your tile gaps to prevent it from drying and forming any unwanted grout haze.
5. Seal your grout
In the same way sealing your tiles will protect them from staining and absorbing excess moisture, sealing your grout will increase its longevity, especially if you’re regrouting tiles in a high humidity environment.
So, simply take the exact same sealant you used to seal your tiles before and apply it over the new grout before it completely dries in order to maximise its protective effectiveness.
Can you regrout tiles without removing old grout?
Given that removing your old grout can be a particularly labour-intensive task, you may be wondering how to regrout tiles without removing old grout. And, while it is possible to do so, we do not recommend it.
Simply put, by not removing your old grout, you’ll prevent your new grout from getting a firm hold. Instead, you’ll likely only be able to apply a surface layer, which will soon flake off to reveal your old grout again, requiring you to redo the whole process again, or more likely, carry out the regrouting step you were trying to avoid in the first place.
Are there any differences between regrouting wall and floor tiles
While floor and wall tiles differ in their size and weight, there is no real difference in the process when it comes to regrouting them. Their grout can be removed in exactly the same way, and you simply need to follow the same grouting process as before when applying your new grout.
Upgrade your tiles with Stone Superstore
You should now know exactly how to regrout tiles. Of course, if you want to change your tiles out for a new colour or design, you can browse the full Stone Superstore range today to find your perfect tile match.
From natural stone tiles to porcelain flooring, we have a huge tiling selection in our range, so you’re sure to find something to match your tastes and home decor.
Get in touch today to learn more and speak with our tiling experts directly, and don’t forget to visit our tiling blog if you’re interested in finding more informative and detailed guides like this one.